february-march: kerri’s instant chocolate mousse

It was the little man’s third birthday earlier this month. Since moving to London, he’s found himself a little best friend, and we’ve made some good friends too. So we threw him a little party! I love planning, styling and DIY’ing as much as I can – a bit of a creative outlet for me which I enjoy and find therapeutic. This year, though, we planned a holiday 2 weeks before the party which meant I only had one week to do everything if I didn’t forward plan and prep. So I did as much decorating as possible, and chose recipes which would freeze well, and was able to get quite a lot done before we went away. I left the birthday cake decorating and just a few things to finish off during the week before the party, and thankfully I did, because the birthday cake decorating took probably double the time than I anticipated!

Dino-lunch set up!

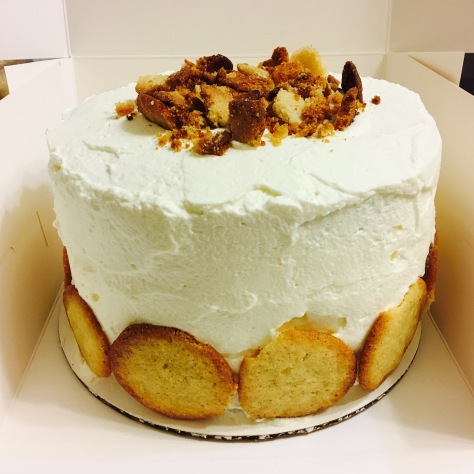
So I could have really posted any of the recipes I chose for this celebration. We had the birthday cake – chocolate and vanilla cakes layered with vanilla buttercream, brownie cookies, Thomas Keller’s white cupcakes with vanilla frosting and fondant dinos, and strawberry stegosaurus hand pies.

But I chose the T-Rex instant chocolate mousse teeth because, well, I could not believe how easy and how instant and how good this chocolate mousse is – I felt I really needed to share it with you! And because it’s instant, it’s easily pipe-able if you want to use it to decorate a cake, fill a cone (as I did), or just make it look pretty!

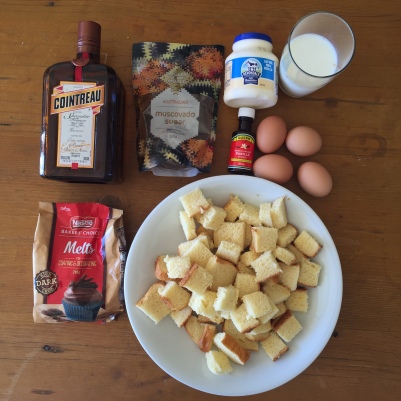
Seriously, this is so good (thanks Nigella!). There’s a pack of marshmallows in there but don’t worry, if you use 70% chocolate, it’s actually not sweet. And as an added bonus, there are no eggs in the recipe, so it’s perfect for those with egg allergies! (Note: it does contain dairy.) So go ahead, make it for dessert tonight.

You can find the recipe here.

september-october: constance’s banana pudding layer cake

Hello friends! I’ve been a bit MIA for a while, so apologies! Following Kerri – I also had a hard time ‘deconstructing’, because frankly, I believe cake should be layered and not taken apart.  Anyways, it was the bff’s 30th birthday and he specifically requested banana pudding. So, I decided to cake-ify it. If there was any deconstruction and reconstructing going on, this cake it is. Plus, I got to use my handy new KitchenAid Stand Mixer.

Banana Pudding is very American recipe, pretty standard in most American family recipe archives. It consists of 4 things: Nilla Wafers, Bananas, Cool Whip and Vanilla Pudding. And typical to Hong Kong, Nilla Wafers were unavailable, so I made my own.

The Vanilla Wafers were really easy to make, and a lot yummier than the boxed Nilla Wafers.

I used both vanilla bean paste and vanilla bean extract which tastes miles better than the processed vanilla in the boxed wafers.

To make the cake portion, I made 3 layers of banana cake rounds in 9in cake pans. For the filling, I used a cream cheese and box vanilla pudding mix. To frost, I used a vanilla whipped cream frosting.

cake-1

To layer the cake, I cut of the domes and started spreading the vanilla pudding filling on the cake. Then, I added 10-15 vanilla wafers. Add the second layer of cake and repeat again. Place the third layer on the cake to complete and frost the vanilla whipped cream around the cake. Decorate the cake with the the remainder of the vanilla wafers.

You can find the recipe here.

cake

september-october: kerri’s malteser cake

I thought I would find this challenge easy as I have had a few ‘deconstructed’ desserts in restaurants, and thought about recreating those experiences. However, as I was choosing exactly what to deconstruct, I couldn’t think of much that really wouldn’t be like not putting the components together like in a pie, and just presenting them separately. Maybe it was a lack of creativity on my part…

But then my Malteser-loving hubby’s birthday rolled around. I had seen a recipe a few months ago for a Malteser Pie, but when I looked for it, I googled ‘Malteser Cake’ instead and voila, found a perfect birthday cake for him!

img_9521

It is deconstructed in the sense that you have chocolate cake, malt frosting which tastes exactly (in my opinion!) like the malt ball, then finished off with some chocolate ganache for more chocolatey goodness.

img_9452

The original recipe uses the whole cake, which has quite a dome on it (as you can see below), maybe to make it look more round like a malteser. The cake was super easy to make, not even needing a mixer (though you do need one for the frosting). But I think next time I would prefer a more crumb-y cake, a more cakey cake. This one was fine, still tasted good but I just prefer a different texture.

img_9547

The original recipe is also wholly covered in ganache, then wholly decorated with Maltesers! I decided to change it up a bit so it was a bit of a surprise on first bite, and also to make it look a bit more ‘mature’ :).

For our little family, I decided to make a mini version, using 10cm springform tins instead of a 20cm tin. I cut the domes off, each cake became a layer (instead of slicing into thinner ones), left the frosting exposed and dripped the ganache over. One of the best compliments from the hubby – he thought I bought it!

And here it is, the finished cake.

img_9455

You can find the recipe here.

july-august: kerri’s raw caramel slice

I must admit, I found this challenge a bit difficult. Mainly because all the raw sweets I had tried, I didn’t really like all that much. I combed through the internet, reading up recipes and looking for something I thought might turn out somewhat yummy to me. On the bright side, though, I was looking forward to something that, if yummy, would be a healthy dessert and / or snack that I could enjoy every once in a while, an indulgence without any ‘should I have’s?’ later.

The end of the month was coming up quickly, and I had spent too long trying to find something to make. So I turned to a trusted source, and voila, found a recipe where I could find the ingredients easily, as well as being quick and easy to make. So thanks, Donna Hay!

IMG_8445

This recipe comes in 3 short steps, which made it perfect to do in between other things. A bit like a multi-tasker’s dream recipe. The first two steps use the food processor, and I didn’t even bother to clean the bowl in between. Just as I was finishing the 2nd step, my food processor decided to die. Thankfully, the mixture was processed enough!

DH recommends freezing the slice for 10 minutes before slicing, but that was not enough time for my top layer to set enough to cut without making a sticky mess. So I decided to just leave it in there and try the slice the next day.

And YES, it was good! It doesn’t taste like a traditional caramel slice, more like a sweet, nutty, chewy (as in caramel chewy) snack that’s great to serve with tea or coffee. I’m actually thinking it would be a great petit four, because {even} I find it a bit sweet to have more than a bite sized serve. But if your sweet tooth is sweeter than mine, go ahead, have a big slice :)

So I’ve decided to keep the whole pan in the freezer and nibble. I think it’s a great thing to have a stash in there for unexpected guests, or for those times you crave a sweet treat but haven’t got anything in the pantry. And the great thing about it – it’s a low GI, healthy, indulgent treat. Now that’s something to smile about!

You can find the recipe here.

JULY- AUGUST: GRACE’S “FERRERO ROCHER” BLISS BALLS

It was with some hesitation that I ventured into the world of raw desserts… sceptical about recipes raving about how beetroot and chocolate mud cakes were interchangeable, or the virtues of cashew cream pies (unbaked and grain free of course). My adventurous side was up for a challenge, but I wanted something that would actually get eaten by my even more doubtful family and friends, so I thought I’d tackle the well trodden path of the humble bliss ball- especially since they seem to be at every cafe about town these days. 

I contemplated quite a few of these recipeshowever in the end, the words “ferrero rocher” caught my eye… and with a simple 4 ingredient list, it was off to the shops I go. 

DSC_8701

What these recipes should warn you though, is that the recipe may call for only four ingredients, but the cost of said ingredients would end up being as much if not more, than the sum of their counterparts! Im happy to pay more for organic, and believe in good produce, but I can’t lie, part of me wanted to just go down and grab actual ferrero rochers and be done with it! 

Pressing on though, the recipe itself was simple- toast of nutty meal here, chops of dates there and a good old pulsing of the blender was pretty much all that was required. Initial smells and tastes were also incredibly promising – with a hazelnut chocolateness building in the air, my hopes rose, perhaps there was something to these bliss balls! 

DSC_8710

However I did find the mixture much crumblier and therefore, messier than anticipated when I attempted to roll the mixture into balls in my hand. I needed to add a bit of honey and about a spoonful of additional slightly melted coconut oil in order to coax the texture to combine together. Other recipes call for coconut cream instead of oil and I could see the virtue in that.

DSC_8713

So, the verdict? The initial bite was definitely a pleasant surprise and they do satisfy the desire for a nutty chocolate fix. I have even decided to try a few more of the bliss ball recipes I came across in my search. However, I think for me it will always be Ferrero Rocher over Ferrero RAWcher. 

DSC_8771

You can find the recipe here.

MAY- JUNE: GRACE’S COINTREAU BRIOCHE PUDDING

Change was clearly in the air here at Buttersweetsymphony because just like Kerri, I’ve also had a change in international postcodes… although for us it was moving to our hometown of Sydney, Australia. It might have been a move home, but we sure did it the least straightforward way possible- fitting in a trip in the opposite direction to Croatia (via Helsinki, and no, that is not on the way), and ending with such a complicated 4+ days worth of travel that to be honest, I’m still not entirely sure where I am, let alone where my baking supplies are!

With that in mind, boozy infusions may have been just what the doctor ordered, yet I was definitely likewise challenged as to what I could make in our “home” (aka temporary apartment). Then, one chilly* Sydney winters night, as I hugged a mug of tea, half a brioche leftover on my kitchen bench, it hit me- bread and butter pudding. The sweet salvation of hearty comfort food is surely one of the great things about winter, so with a few tweaks here and a few sips of cointreau there (for taste testing purposes of course), we found ourselves with a crowd pleaser.


IMG_6379

There’s nothing not to love about this super simple recipe. It won’t win any contests for its lumpy looks but that intoxicating smell well draw you in and that custardy sloppiness is just perfect for dipping a big spoon into again and again…

IMG_6385

Winter calls for indulgence so it’s not necessary but highly recommended to serve this with some cream whipped with vanilla beans/essence .

You can find the recipe here.

*I am well aware that compared to most of the world, Sydney has no place complaining about any winter “chills” but having been in Singapore the last 3 years, anything under 10 degrees is COLD (and I’ve loved it!)